I bought a dozer about a month ago with my father inlaw. He had no luck with it sO I decided to bring it to my house as I have more time than him to mess with it in the evenings.
I brought it home this weekend and started working on it. So far it's not good, I drained the oil and it looked like mud. Looks like this will be a rebuild thread, and since I haven't ever done rebuild a diesel engine this might be an adventure.
WOAH!! ---That sucks!-- Well --diesel is the same as gas--except for injection pumps and injectors, so it should be easy to work on.-- I assume its metric bolts and Komatsu parts should be common so that's in your favor ----- unlike the motor on the chipper I did have that was a VM Motori which was Italian and NO parts what so ever!
"A machine you build yourself is a vote for a different way of life. There are things you have to earn with your hands."
I did a compression test on the dozer about 3 weeks ago. It was not good, It had 200, 240, 70, 60. I posted this on FB and was suggested to put a little oil in the cylinder and retest the compression. I finally did that tonight and the compression didn't change.
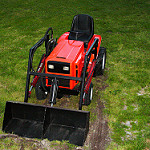
I guess the next step is to pull the engine and tear it down. I think I'll finish the mower before I jump on that. Here are some pics of it.
Bringing it home
The hour meter shows 1635 hours. Here are the sprockets. I'm not a track expert, sprockets look sharp to me. Got to get it runniing before I worry about that. Track tensioners are also pretty tight.
Sounds like engine rebuild will be needed. Former owner didn't take care of the machine??? Sprockets do look way too sharp----when you get the engine fixed and everything else works good-----then you can do track work but maybe use it a little first. It looks like a nice dozer overall and a handy size to move around.
"A machine you build yourself is a vote for a different way of life. There are things you have to earn with your hands."
Jim the dry thinwall chrome liners like in Kubotas and my Isuzu compact diesels are a PITA..the heavywall liners are quite easy to do with the proper tool..OTC and others make the liner pullers they go about 800 for the kit thats pulls them out.You might be able to fab one(yes we are machine builders here) it could be done with some 1"all thread or (better)-acme threaded grade 8 rod and some heavy pattern nuts..I tried to fab one for the thinwall liners but it didnt work,they were clinging to the block like no ones business,very tough to move,I finally had to torch them out with a gas welding torch,heating the metal and peeling it in a strip,off the block wall then curling it in on itself and pulling out. The new ones went in easy once shrunk with dry ice, a block of hickory and a deadblow hammer. I think the critical thing to watch is deck protrusion of the new liner once inserted into the block and lubing of any o-rings that fit on the liner to seal coolant.The dryfit liners have no o-rings,they only seal combustion,the coolant never touches the dryfit liners.
I think the ones in my Detroit 3-71 were dry type. ---I just got under the tractor and knocked them out with a square iron bar,---might have gotten lucky on that one! lol!
"A machine you build yourself is a vote for a different way of life. There are things you have to earn with your hands."
I did a job for a buddy years ago. it was a box \truck think it was a Volvo engine if I remember right. there were o-rings on the cylinders. I fabricated a jig with all thread to both pull the old cylinders and press in the new ones. Only had to redo one cylinder. felt lucky.
I know a lot about a lot of things BUT I still have a lot to learn. Life is what you make of it. So, why not make a working machine to make it easier.
Sonny the Detroit engines are a beast all in themselves but are wet liners from the ports up. The thinwall liners Im speaking of are thin chrome plated wear liners,about 1/8" thick that press fit inside the block cylinder bores of small diesel engines..think a standard block,iron bore but a thin liner-(like a smooth tin can)-that presses into that takes the wear. A lot of people cant figure them out because for the most part they are a PITA to pull out. There are tools to do it,but most ive seen done just get torch heated and peeled out..you have to shrink the new liner with dry ice to get 'em installed.They have an interference fit,usually with a lip at the top that fits a recess in the top of the bore to seat them.Nothing at the bottom. Jim the Volvo job you describe is standard cylinder liners you pull out.To get us back on subject I believe Gator's Komatsu is regular thick liners.
I have done most liner replacements all 71gmc are dry liners till you get to the 92 engines, the c24 I built a puller to get them out and push them back dry. the thing to look for on wet liners is the O rings some engines have top and bottom were others go in any grove.
Hey Tom I got the 71s confused with the 92s. They drop back in pretty easy if everything is clean but lube the o-rings with Crisco or whatever shortening you have.Works like a champ
A wise man uses plenty of safety blocks under equipment working on it..I sure do..Im not trying to be critical of your operation but I wouldnt trust that lift except maybe with a small car
Well I dropped the oil pan tonight and it's not pretty. The cylinder liner is rusted heavily on a couple cylinders and in one spot the cam shaft is heavily rusted. I think it probably has a blown head gasket, and was left sitting with water in the oil for a long time. I am not a diesel mechanic by any means. It looks to me like I definitely will have to pull the engine. Hopefully I can find a new cam shaft and lifters. I may take the engine out and then take it to someone who knows what they are doing and let them rebuild it.
I didn't do it tonight but tomorrow I will spray down the inside with WD40 or something so that it won't rust more while is is sitting there open.
sometimes a dose of kerosene and Marvel Mystery Oil and/or ATF fluid and let it roll around a bit with the starter will flush out a LOT of crap..but it looks as tho yes you had some water in that engine for some time..I'd be leery of the trans/cross shaft compartment just the same, and finals as well. Finals are usually 80w90 but you can't tell what water you might have in there too..an old Cat mechanic told me once-"fix it right,fix it once" (Ontario Bob-RIP)
I sprayed it down with wd-40 tonight, didn't feel like getting into it too much tonight.
The way the exhaust mounts it looks like it might have filled with rain water. The guy we got it from said it was running when parked, and it sat for awhile. Either way it looks like it was definitely filled with water. Hopefully not from the bottom of a lake....
I plan on changing all the fluids before it gets fixed.
I need to verify the engine model number before I order parts.
I would say water---not anti-freeze from the looks of it. --- either rain or lake water. Anti-freeze usually looks different when it goes into the oil,--like real nasty---this looks too clean for that-- gotta be just water. Main thing to check next would be transmission to see if it too has water in it. --- I would suspect it was just rain got in the exhaust,---easy for that to happen even with a cover on the muffler/pipe.
"A machine you build yourself is a vote for a different way of life. There are things you have to earn with your hands."
with the pan off can you get the engine to turn over at all? or is it locked up tight? you'd be amazed just how durable these engines can be,even with a little water corrosion inside.Clean the pan and oil pump,reasssemble and oil it up with some of the lightest oil you can find and turn it over..if you cana get it to run then OK take it easy with it and let it run awhile..then drain the oil and repeat..it might just flush out what ails it..that cam lobe thats a bit corroded just might flake off and clean up as well..I guess it depends on what you want this to be..if its a linered engine it just might be a weekend rebuild,not too hard to do, you have the shop..not like me that has to schedule things around the weather.
looked like one of the cam lobes had some rust on it,thats the only thing that might be harmed by turning it over as I can see but you never know till you pull it apart..Ive got a Fiat diesel here to do the same with..runs fine but down on HP from normal 115hp, now its down to about 65hp..she's done her time at 11,000hrs
Got to work on the dozer a little tonight. Drained the radiator and pulled the front shroud. Little bugger is heavy.
On the back of the engine the hydraulic pump is direct mounted to it and passes the drive shaft through to a output drive shaft going into the transmission. The transmission is supported by the engine so I am going to pull it with the engine then try to take it apart once I have it on the floor or a stand.
I have been looking for rebuild kits and a cam shaft, I have found the rebuild kit but the cam shaft may hurt the pocketbook...
cams can sometimes be costly ----- problem is that IF you dont replace it in this case being a diesel would result in disaster. Diesel motors are not very forgiving-----sadly.
"A machine you build yourself is a vote for a different way of life. There are things you have to earn with your hands."
The engine mount bolts on this thing are extremely tight. The front ones were in the open. I was able to put a 4' cheater on then with a socket and break them loose. It was still tight even with the cheater. The rear bolts are up under the console. I have ordered some crow foot wrenches hoping I can get those on there. If I can't get them loose I will have to remove the cab...Not giving up yet on the bolt though.
I have to use an open end crow foot wrench on one of my New-Holland 781 lines under the body of the loader ---nuttin else would go in there. Crow foots are nice when you have little space to work in. I had heard that some of the machines from Japan and other countries over there have some tight bolts in them -----good thing in one way but a pita for us guys when repairs are needed.
"A machine you build yourself is a vote for a different way of life. There are things you have to earn with your hands."
never ceases to amaze me what a bit of torch heat and some PB Blaster will do for stuck or seized nuts and bolts..heat it up and spray it down the day before,let the PB work its way in..the PB is lot cheaper than 'Kroil',the next best thing..I've been using copper flake anti-seize on everything with threads now..it sure helps
I have put PB blaster on it, the problem with that is that the bolt is about 5" long. There are two sets of rubber isolators between the bolt head and location of the threads. The bolt threads from the two front bolts look like they have loc tite on them. Most of the time Loctite breaks down with torch heat. Problem is that as I have taken it apart hydraulic fluid and deisel have dripped everywhere. I caught most of it but it is still all over the place. I think I could heat it without catching the machine on fire but I don't want to risk it. Not worth it to burn my whole shop down over these two bolts.
I have tried some crazy things over the last week on it. I ordered a crow foot wrench, I put it on and was able to get a 1/2" drive ratchet on it. I still didn't have room for a good cheater so I took a porta power and braced on the car lift leg and pushed on the wrench handle. It pushed till the wrench couldn't move more. I reset it and the crow foot opened and popped off..
I took off some hydraulic lines and was able to get a box wrench on the bolt head. I put a shackle on the wrench and pulled it with a come a long. I pulled till it bent the wrench. The wrench bent until it got blocked and I gave up on it.
I have removed all the bolts from the console and have it ready to pull. I think I'm going to go ahead and change all the hydraulic hoses, it will be easier with the console is gone. The Roll cage is pulled back and I have clearance to the remove the console. I actually pulled it loose trying to pivot the cage back.
When I pull the console I will have direct access to the bolts
not trying to second guess your actions or thought process..sometimes you have to get into it and not worry about fluids on the floor..the worst is brake fluid, it burns easily and is hard to put out,Ive had a few under-vehicle brake fluid fires (by torching-) I think you could get a oxy torch on those bolts if you use a welding torch tip (not a cutting torch) Of course It's easy for me to say up here in MD and not being there on your shop floor in MS to see it in person..Man I can imagine the frustration with a couple bolts holding up the whole operation.
Ok Gator--I have to just say you have been diagnosed with a full-on case of the yellow iron disease..no nasal swab required, just greasy hands..you might have to quarantine for 15days or so
WOW! thats a lot of work! --- while you are that far---- might be a good time check every nut, bolt, and part down under there----- also the wiring if any that far down. Too bad that you have to go so far just to get engine out!
"A machine you build yourself is a vote for a different way of life. There are things you have to earn with your hands."
Looks like you're getting a clean start,Gator..I thought maybe it had a torque converter/trans drive,not a clutch..anyway glad to hear you are paying attention to the electrics,most people won't and then struggle and wonder why the new engine they just rebuilt gives them problems..wiring and GOOD CONNECTIONS is very important. Sure wouldn't hurt to upgrade some of the wire as well,most manufacturers will economize in a lot of places,like alternator to battery wire,neutral safety switch wires and battery leads themselves..if it's a diesel I always go with at LEAST a #2 welding lead for the battery + and frame grounds as well,no substitute for real copper..nothing like a good frame ground as well, grind off a spot and establish a good metal land,maybe drill and tap an additional frame ground point..just my 10c..I have an old Cat loader which has all the wiring enclosed in what looks like flexible electrical conduit..plastic coated metal flex..really keeps the mice and rats,etc from eating the plastic wiring..The black plastic flex split loom works pretty good too..tends to melt with high temps but I'm sure you are aware of that as well in your harness routing..Nice to see the photos keep up the good work
Lookin good Gator! --- Bunk--the 20-p is clutch drive and they had the converter drive model as well --it goes as model 20. should be a great little dozer . One of the road jobs I hauled to when I drove for Melton's had a 20 that they used in field entrances to level gravel and the operator was a whizz on it. --- little 20 did amazing work in small areas plus easy to move.`---plenty of power to work the ditch banks and level gravel in field entrances. Nice light dozer to do serious work with!
"A machine you build yourself is a vote for a different way of life. There are things you have to earn with your hands."
This is beyond my comfort zone, but it's give it a shot of pay someone else and I can screw it up 10 times and still not have the cost of someone else doing it.
This afternoon I tore into the engine. Got it down to the block. I had to spent an hour cleaning from my first efforts and organizing all the stuff I had already taken off before. I bagged the bolts from each individual section and labeled them. I also sorted the parts in order on a table as I took them off. I ran out of room at the end, but I think I can make sense enough of it to get it back together. Looking at it I think the engine filled with rain water and that rusted the cylinders enough to ruin the rings when it was turned over.
Got lots of pics to post
You can see the rust on these gears where they were immersed in water
It looks bad but I scrapped the rust off and I think the gears will be OK. I'm going to inspect them more before I decide.
This is not good.....luckily I chatted with a guy that I hope joins on here, he confirmed what I needed to order and I found a cam shaft included in a rebuild kit.
kinda looks like you might be into a new cam, clean the bore bottoms up with some crocus cloth and oil..install new oil pump, some new piston rings,valve job and reassemble. At that point I think a new water pump while you have it out might be a good idea..I cant tell from the photo, how do the crank journals look?
>pay particular attention to total fuel system cleanliness upon getting it all back together,flush,flush and flush again....a small amount of dirt into that injection pump could mean a bill much larger than the whole rebuild in itself..FWIW
We had a Vulcan Storm Cleaner at college. It got stuff so clean that the stuff we cleaned would flash rust if we didn't spray the stuff down with WD-40. One of those would take care of that surface rust. You'd still need to clean out the oil passages with a wire brush. Would take the rust off of those timing gears too. It would be worth it to me $$$
the gears will clean up good----cam--I would use a new one to be safe---this one will clean up, BUT how many hours does it have on it?--who knows, so new one there to be safe! new oil pump a must and you could go new water pump since you are there. Mic. the crank and also the piston bores to see IF need machine shop visit or not. ----could get lucky on them just never know. Ya that motor had rain water sitting in it big time! ---sad how some guys treat their equipment! I bought several tractors with same deal---water in pistons and motors stuck! Your making progress for sure! ---stay with it!!
"A machine you build yourself is a vote for a different way of life. There are things you have to earn with your hands."
Gator, go buy a half dozen stainless steel scrubbing pads for pots and pans, use them with a mixture of 75/25 ATF/Diesel fuel to remove the rust from the inside of the block. They do not break down into grit like 3M scrub pads do. I rebuilt a little two cylinder Japanese diesel that had rust inside the block, it took three changes of fluid in my parts washer to get all the grit from the 3M pads out of the engine block. Looks like you are making good progress. Good luck. Dan.
Tools are to men as shoes are to women, you can never have too many!
I looked at the block pretty good and it didn't look like it had sleeves in it. A Komatsu field Tech contacted me Saturdat from one of my FB posts and sent me a engine manual. The engine doesn't come sleeved, they are only to be sleeved after it can't be bored further. I am going to check with a engine shop as soon as I get a chance. I am hoping that they can just clean up the bores and replace the pistons with standard size. There is also an option to buy oversized pistons if I have to get it bored. Last option would be to machine it for the sleeves.
The manual he gave me has good drawings on the boring procedure is needed.
All that said I am not a diesel mechanic by any means. I may end up having to at least get the short block build by someone that knows what they are doing. At the end of the day I want it to run whoever fixes it. On the other hand I like to learn as I go so who knows. I think the first step is to get a second opinion on the cylinder bore so I can get the right parts on order.
All the parts will end up coming from China so whenever the parts get ordered it will take awhile to get them here.
Gator you'd be surprised at just how fast freight is these days, especially with the holiday season and all the online shopping volume has caused carriers to add staff and flights for cargo..I ship gensets around the world and have seen the speed of freight increase greatly the last month..Isuzu rebuild kits(pistons,rings,gaskets and bearings)from the Philippines comes within a week and a half..most of the time it's hung up in customs..anyway you might be able to flex hone the bores if they aren't too bad..the end word will be the bore mike,get a spec sheet and see what the sheet says on bore diameter vs.the mike readings at three spots in the bore.Even if she's loose it'l still run but for how long you don't know so if its a keeper machine better just pay the man and do it right while it's apart and in front of you. Your injection pump makes a huge difference on starting performance and power..I've never done a Komatsu engine or inj pump, only the old stanadynes..bag that pump asap and keep it clean during the process,you have heard me preach that before..best of luck and keep us posted
I figure I should give a update. The parts came in a reasonable time from China. They look like good quality also. The machine shop wanted to have the piston in hand before starting work on the engine. That way they could verify the bore that they needed. They also had about 80% of the help out for several weeks due to contact tracing.
Anyway I got the block back about three weeks ago. I then was out of town for a week so I was delayed starting some. I am on a Komatsu group on FB and a guy on there gave me a rebuild manual for the engine. It has step by step instructions for taking it apart and for building it back. The manual includes clearances, tolerances, and torque specs on everything. I have been using the manual step by step just to make sure I don't miss anything.
My heater also went out in the shop so there has been less motivation to get out there after work. I got started on it on Sunday last week. Here are some pics. At this point I am missing a bolt in the exhaust manifold. Also the water pump that I was sent is a different model than the original. It will bolt up but looks like it came on a different model originally, I'm not sure how I want to deal with this. I may modify the pump I have. I don't want to spend the money on another and sending the other back to China might not make financial sense. If I go with this pump I will need slightly longer bolts and a different shape hose.
always great feeling sliding pistons into a new bore..I've got a Iveco engine to do myself in the springtime,amongst 7 other projects LOL Nice work and to see the update.
I haven't been very quick about getting this back together, or good about keeping the forum up to date........Got the engine bolted back in tonight, I put antisieze on the mount bolts for sure this time.
Still have a good bit to do before I can try to fire it up.
I got the radiator, and all the hydraulic tubes hooked back up along with all the control rods. Its a lot more work than it looks like. I have also been taking it easy as I go.
Here is how she sits. I have to add all the fluids back (currently completely drained), buy a couple bolts and nuts, figure out what I'm going to do with the muffler, and it will be ready to try. I also have to rig up gauges and a starter switch and a kill switch.
Got it fired up this weekend. Started easily, then figured out the slow idle was set way too fast. had a few moments of panic, Now it seems that I have stuck steering clutches.
Here is after I got is slowed down and tried the tracks out.
Great videos and narrative Gator..glad to see it coming back together for you..didnt know about the JIS adapters..valuable information..get some oil in 'er and get it outside and run it around those clutches might just break free!! best of luck


![[Linked Image from live.staticflickr.com]](https://live.staticflickr.com/65535/49689393371_345fbc8c31_z.jpg)
![[Linked Image from live.staticflickr.com]](https://live.staticflickr.com/65535/49688861338_92feace756_z.jpg)
![[Linked Image from live.staticflickr.com]](https://live.staticflickr.com/65535/49689699052_5c42527c8e_z.jpg)
![[Linked Image from live.staticflickr.com]](https://live.staticflickr.com/65535/49688863398_e8a5a4a6f6_z.jpg)
![[Linked Image from live.staticflickr.com]](https://live.staticflickr.com/65535/49983323972_7346526bed_z.jpg)
![[Linked Image from live.staticflickr.com]](https://live.staticflickr.com/65535/49982542188_a6f40b543a_z.jpg)
![[Linked Image from live.staticflickr.com]](https://live.staticflickr.com/65535/49983066696_6ae407fc8e_z.jpg)
![[Linked Image from live.staticflickr.com]](https://live.staticflickr.com/65535/49983066306_81541a7ef2_z.jpg)
![[Linked Image from live.staticflickr.com]](https://live.staticflickr.com/65535/49983323302_12e9f3da04_z.jpg)


![[Linked Image from live.staticflickr.com]](https://live.staticflickr.com/65535/50257208011_fbdedf4b4f_c.jpg)
![[Linked Image from live.staticflickr.com]](https://live.staticflickr.com/65535/50257391197_7a554c41a0_c.jpg)
![[Linked Image from live.staticflickr.com]](https://live.staticflickr.com/65535/50318573577_3e24d43abc_b.jpg)
![[Linked Image from live.staticflickr.com]](https://live.staticflickr.com/65535/50318572837_243c78f5d3_b.jpg)
![[Linked Image from live.staticflickr.com]](https://live.staticflickr.com/65535/50318572672_9ab978b3d8_b.jpg)
![[Linked Image from live.staticflickr.com]](https://live.staticflickr.com/65535/50318389341_8910cd3ba1_b.jpg)
![[Linked Image from live.staticflickr.com]](https://live.staticflickr.com/65535/50318389416_f89651a3f1_b.jpg)
![[Linked Image from live.staticflickr.com]](https://live.staticflickr.com/65535/50318388361_912232c4e3_b.jpg)
![[Linked Image from live.staticflickr.com]](https://live.staticflickr.com/65535/50318571132_a5a1954540_b.jpg)
![[Linked Image from live.staticflickr.com]](https://live.staticflickr.com/65535/50257391467_c38c4a012b_b.jpg)
![[Linked Image from live.staticflickr.com]](https://live.staticflickr.com/65535/50557790967_1c0c381714_b.jpg)
![[Linked Image from live.staticflickr.com]](https://live.staticflickr.com/65535/50592644352_1cb97f2d3c_b.jpg)
![[Linked Image from live.staticflickr.com]](https://live.staticflickr.com/65535/50592644397_ace22e12a8_b.jpg)
![[Linked Image from live.staticflickr.com]](https://live.staticflickr.com/65535/50592517721_e673675dc3_b.jpg)
![[Linked Image from live.staticflickr.com]](https://live.staticflickr.com/65535/50592644512_1b643db79a_b.jpg)
![[Linked Image from live.staticflickr.com]](https://live.staticflickr.com/65535/50596090802_8feb683376_c.jpg)
![[Linked Image from live.staticflickr.com]](https://live.staticflickr.com/65535/50595226163_6d1bac4bb4_c.jpg)
![[Linked Image from live.staticflickr.com]](https://live.staticflickr.com/65535/50627239538_631ac51f19_c.jpg)
![[Linked Image from live.staticflickr.com]](https://live.staticflickr.com/65535/50636307032_d5c2045434_c.jpg)
![[Linked Image from live.staticflickr.com]](https://live.staticflickr.com/65535/50636225481_50137a25d2_c.jpg)
![[Linked Image from live.staticflickr.com]](https://live.staticflickr.com/65535/50635476203_41bf882144_c.jpg)
![[Linked Image from live.staticflickr.com]](https://live.staticflickr.com/65535/50663570076_ba2d8261c4_c.jpg)
![[Linked Image from live.staticflickr.com]](https://live.staticflickr.com/65535/50663649242_e1b8803c6b_c.jpg)
![[Linked Image from live.staticflickr.com]](https://live.staticflickr.com/65535/50663647982_ffea371ed7_c.jpg)
![[Linked Image from live.staticflickr.com]](https://live.staticflickr.com/65535/50662825638_7f0fa9c734_c.jpg)
![[Linked Image from live.staticflickr.com]](https://live.staticflickr.com/65535/50663646587_264c32c712_c.jpg)
![[Linked Image from live.staticflickr.com]](https://live.staticflickr.com/65535/50663566601_389bc119a4_c.jpg)
![[Linked Image from live.staticflickr.com]](https://live.staticflickr.com/65535/50663563801_b351d05de9_c.jpg)
![[Linked Image from live.staticflickr.com]](https://live.staticflickr.com/65535/50663643612_dc07121dee_c.jpg)
![[Linked Image from live.staticflickr.com]](https://live.staticflickr.com/65535/50663563471_93d3deca0d_c.jpg)
![[Linked Image from live.staticflickr.com]](https://live.staticflickr.com/65535/50662821258_0712107367_c.jpg)
![[Linked Image from live.staticflickr.com]](https://live.staticflickr.com/65535/50957416333_173fc273a9_c.jpg)
![[Linked Image from live.staticflickr.com]](https://live.staticflickr.com/65535/50958220347_58166e2575_c.jpg)
![[Linked Image from live.staticflickr.com]](https://live.staticflickr.com/65535/50958114016_bc7560d062_c.jpg)
![[Linked Image from live.staticflickr.com]](https://live.staticflickr.com/65535/50958219427_bfb49e48cf_c.jpg)
![[Linked Image from live.staticflickr.com]](https://live.staticflickr.com/65535/50958219367_e23a57f707_c.jpg)
![[Linked Image from live.staticflickr.com]](https://live.staticflickr.com/65535/50958113401_667894fd09_c.jpg)
![[Linked Image from live.staticflickr.com]](https://live.staticflickr.com/65535/50958218932_ae134982ff_c.jpg)
![[Linked Image from live.staticflickr.com]](https://live.staticflickr.com/65535/51048196942_c7853985a1_c.jpg)
![[Linked Image from live.staticflickr.com]](https://live.staticflickr.com/65535/51048196947_191d75fc56_c.jpg)
![[Linked Image from live.staticflickr.com]](https://live.staticflickr.com/65535/51115513340_6c2c7cf776_c.jpg)
![[Linked Image from live.staticflickr.com]](https://live.staticflickr.com/65535/51114474364_8d0f588a01_c.jpg)