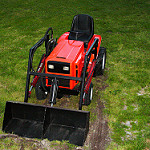
I would like to build a front end loader for my Simplicity 7116. Dose anyone have any plans or pictures or anything that would help me with this builld?
just for starters, make sure your tractor has the stones for loader operation..a lot of the frames need additional bracing to handle loader stress..a good idea is to run length wise tubing from the front to back to spread the weight stresses out along the frame and transaxle..since you did say it was a Simplicity that you are using, it might be do-able, the 71 series were some pretty stout tractors in the day. Vertical loader mast posts might be 2x4 tubing with 3/16"wall..I'd run my loader arm hinge pin all the way across the machine uprights,maybe use 1" 4140 steel to hinge/support the loader arms..I've had good success with arms made from 1/2"steel plate. 2"bore cylinders are more than enough to lift anything you'll need to be doing with this size tractor. I've used used salvage cylinders in the past,only to have them blow out after using them for a few months..my advice buy your cylinders from Surplus Center,you have a reasonable chance at them lasting a while then..PITA to take apart a newly fabbed machine only to make repairs,I could write a white paper on that itself...you'll get help here at MBN thats for sure..lots of loaders built here.
I would nominate a sunstar 20! ---- power steering on them. hi-lo hydro, turning brakes, AND diffy lock! --- Simp. even offered a loader for this model. I have four 20's and an 18. A friend of mine has a 7116 and the diffy section is known to shuck gears really bad. I know of 3 of them not far from here that did that, so IF it were me I would choose a little better model for loader and as Kevin said,--power steering is a must!---- makes a whole different game with it.
Another good one would be cadet 147 series, --- BUT no power steering on them. A guy down the road from us had a 147 with a loader on it that he used in his hog sheds. --- The front wheel bearings dont last long under hard use, so that will something to watch and replace them before they go completely out and damage something else.
Which ever model you chose,-- make your loader sub frame long like Bunkclimber says and you wont regret it. ---- these little tractors will generate a lot of torque with a loader on them and things have to withstand it.
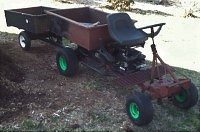
here are a few ideas to kick around. --- I like the idea of the trailer stub axles mounted under loader front axles, --- that would end bearing failure in the standard mower axles!
Last edited by sonny; 12/27/202008:02 PM.
"A machine you build yourself is a vote for a different way of life. There are things you have to earn with your hands."
built complete new spindles for mine.. those little 5/8 axles wont handle any thing. Using a marine hydraulic helm for the steering. 0 feedback ..your going to need different tires too...
I know a lot about a lot of things BUT I still have a lot to learn. Life is what you make of it. So, why not make a working machine to make it easier.
If Surplus Center had shipped my Items the day that I placed the order (Last Monday) or even the next day, I'd be out there tinkering away on my loader. But my very early order , made on Monday didn't leave there until Wednesday As it is, The box sits at the closed Johnstown, PA UPS facility.
Any body have any other suggestions as to where to buy parts & supplies so that in the future I have options ?
patience my friend,Surplus Center usually fills an order within two days or so,the shipping delays are still going on out there..I bought some quick-connects for the Isuzu generator fuel system on Tuesday and the order wasn't filled and shipped until Thursday that week..not too bad, you are not their only customer..this is why when I order I get multiples of a fitting and put the extras in the hydraulics drawer in my shop,that way I'm not held up for DAYS over a $2.50 hydraulic part that I can't easily get locally. If you have an account with MSC (mscdirect.com) they ship pretty fast and have all manner of industrial parts and supplies onhand in Harrisburg,they usually ship same day for me,I get it next day if shipped UPS Ground. I think you can order by phone with them with a CC as well,don't have to have an account to buy from them..there's always Grainger,too..they ship UPS..just a thought..
Additionally, a loader is one thing for scooping barn s@#$ or hay into a truck or wagon, but excavating equipment is a different build altogether..much stronger components and build heft needed to excavate.. I see farm tractors pushed beyond design limits quite often an they usually wind up with twisted loader towers and bent masts,etc from off-axis attempts at digging..like loading one corner of the bucket into something normally immovable and 1st gear clutch dumps..Can't fix stupid..
My experience with almost ALL the parts suppliers is at least 2 business days from order date before the order actually ships. If it comes early its a bonus.....
I know a lot about a lot of things BUT I still have a lot to learn. Life is what you make of it. So, why not make a working machine to make it easier.
YA---- ALL of our orders for the last 2 months have been REAL slow getting here too! --- One 2-day postal box took over 3 weeks to get here and was filled/shipped an hour after order was placed. ---- I am afraid things will get worse before they get better. Most stuff we need is not available local at any price so the wait goes on for everybody.
"A machine you build yourself is a vote for a different way of life. There are things you have to earn with your hands."
I would nominate a sunstar 20! ---- power steering on them. hi-lo hydro, turning brakes, AND diffy lock! --- Simp. even offered a loader for this model. I have four 20's and an 18. A friend of mine has a 7116 and the diffy section is known to shuck gears really bad. I know of 3 of them not far from here that did that, so IF it were me I would choose a little better model for loader and as Kevin said,--power steering is a must!---- makes a whole different game with it.
Another good one would be cadet 147 series, --- BUT no power steering on them. A guy down the road from us had a 147 with a loader on it that he used in his hog sheds. --- The front wheel bearings dont last long under hard use, so that will something to watch and replace them before they go completely out and damage something else.
Which ever model you chose,-- make your loader sub frame long like Bunkclimber says and you wont regret it. ---- these little tractors will generate a lot of torque with a loader on them and things have to withstand it.
here are a few ideas to kick around. --- I like the idea of the trailer stub axles mounted under loader front axles, --- that would end bearing failure in the standard mower axles!
That's what I did for mine. I made the whole mess up. Grade 8 bolts for the kingpins. I originally had bored out a 1" spindle & welded it on the original tractor spindle. Just a couple of loads and they snapped off. Just weren't heavy enough. Welded the bolt in on the spindle and wa-la. Haven't had a problem since.
I know a lot about a lot of things BUT I still have a lot to learn. Life is what you make of it. So, why not make a working machine to make it easier.
I did something slightly different on mine, there is a backing plate behind the wheel bushing and a "stop" plate where the pivot bushing rides, I tied them together with a 1/4" gusset. I also bored out a 1" round spindle 5/8 to go over the mower spindle, then welded that on. I didn't have the milling machine then. I have busted other things on the axle (tie rods, basically the entire steering setup, center pivot plates) but haven't killed these yet.
The thing about doing it your way is that most trailer tires are a little bigger than tractor fronts, and you can set the wheel centers an inch or two higher relative to the axle beam than original to compensate for the difference in wheel rolling diameter. My tractor has a slight tilt to it...
[quote=GLyford]I did something slightly different on mine, there is a backing plate behind the wheel bushing and a "stop" plate where the pivot bushing rides, I tied them together with a 1/4" gusset. I also bored out a 1" round spindle 5/8 to go over the mower spindle, then welded that on. I didn't have the milling machine then. I have busted other things on the axle (tie rods, basically the entire steering setup, center pivot plates) but haven't killed these yet.
The thing about doing it your way is that most trailer tires are a little bigger than tractor fronts, and you can set the wheel centers an inch or two higher relative to the axle beam than original to compensate for the difference in wheel rolling diameter. My tractor has a slight tilt to it..Had I welded a little gusset on each axle they may have survived. yours looks exactly what Mine used to look like..... Less the gusset
I know a lot about a lot of things BUT I still have a lot to learn. Life is what you make of it. So, why not make a working machine to make it easier.
I apologize in advance, this update is woefully short on pictures.
Busted off the steering arm you can just see under the axle beam. Welded it back on, and removed a footboard brace that was keeping me from making a sharper left turn. Not worried about the footboard sagging since the loader arm support runs just under it too.
Added a gusset to the steering arm when I put it back on, maybe it will last a little longer this time. Also changed the axle beam pivot, this unit used a 3/4" pivot pin, riding in a thin steel bushing in the beam (not even sure it was welded, may have just been pressed in). I had some 1-1/4" shaft and setscrew collars, so took two collars and a short section of pipe and welded them together. Drilled and tapped the pipe in the middle 1/4-28 for a zerk.
Took a section of 3/4 dowel 2" long and drilled a 1/4" hole through it lengthwise. That let me use a 2" holesaw with the center pilot drill in the dowel, which was in the old bushing. Did that from both sides, and the top of the hole was tangent to the top of the beam. Cut out the section of the top between the two holes in the sides about 1" wide, then welded in the shft collar bushing thing.
Before doing that, though, I took a chunk of the shafting and turned one end down to 3/4", about 5/8" long. I have a chunk of 1/2" plate inside the stamped axle bracket on the backside of the beam, so this will just stick through the existing hole in that plate. 2" further up the shaft (the axle beam is 2" thick") I used a cutoff tool to cut another 3/4" diameter, and then cut the whole thing off leaving that 1/8" long. I then drilled and tapped both ends with a 1/2" thread. The old pivot relied on the axle mounting plates to keep the pivot pin in place. There was a through slot 1" lower that had a 3/8 bolt connecting the two sides. The frontmost plate has a double-D shaped hole to catch two flats on pivot pin. So on the 1/8" long shaft stub, I filed matching flats. Stuck that in the bracket, and trapped it in place with a 1/2" bolt. Then used this whole plate-and-pin as an alignment jig when welding the shaft collar mess into the axle beam.
One side fit up nicely, and was real easy to get welded in. Cleaned it up flush after with a flap wheel. On the other side, the holesaw hole was not centered sideways on the beam, a little filing got it in place square, but the gap on the other side was between 1/8 and 3/16. So I used a trick I saw someone else use on a youtube video, I grabbed an extra rod (I was using 3/32 7014) and used that as a filler rod. More like held the tip in place and ran my arc across it than real tap-tap-tap in the puddle filler like a proper skilled tig or gas welder would do. Still let me fill that gap without burning huge holes all over the place.
Before putting the whole mess back in, I made sure to drill a grease gun access hole through the top of the bracket where it goes over the axle beam so I could grease the new bushing.
Then threaded the long end of the pivot into the frame half of the axle bracket (and thick plate) and bolted it in using the three top holes and another 1/2" bolt from the back into the pin.
Discovered I can't really grease it very well, the motor overhangs the access hole about 2" away. Maybe I can find an angled grease gun tip...
I will try and grab a pic of the steering arm repair and whatever I can access of the rest being it is already installed. I can't promise that my welds are anything worth looking at, I overcompensate by welding lots.
sounds like you been busy on it! --- That should hold up for you. As far as picture welds,----I dont even try anymore! -- I just want stuff to hold together! lol!!
"A machine you build yourself is a vote for a different way of life. There are things you have to earn with your hands."
I got a grease swivel. I put a 1/8" NPT zerk on it so I wouldn't have to unscrew the locking one from my hose, just clip it on.
But that was still too long. Looking in my assortment of zerks, I thought of another approach, just put a 45 fitting on the back of the grease chuck. Could have saved myself the cost of the swivel, but now I have one if I ever need it, and can remember where it is. (Replaced the front wheel bearings in the truck a month ago, just found the bearing packer this week. About time I learned to pack them by hand anyway.)
Revised and shortened:
This fit nicely
Steering arm
Not great photos but I think you can see where the arm was put back on, next to the spindle, and the little angled piece to hopefully make it break somewhere else next time.
I noticed that the spindle bushings in the beam move forward and back some, I think I will put a couple of heavy tacks on them to take out the play. Will probably have to clean the grease and oil off them first, weld, then put new oil back on.


![[Linked Image from live.staticflickr.com]](https://live.staticflickr.com/65535/50823032706_ae2c5c174b_c.jpg)
![[Linked Image from live.staticflickr.com]](https://live.staticflickr.com/2743/4031207603_f80d55d9cb_w.jpg)
![[Linked Image from live.staticflickr.com]](https://live.staticflickr.com/65535/51444476604_c67083861f_m.jpg)
![[Linked Image from live.staticflickr.com]](https://live.staticflickr.com/65535/51444698400_8bbb6b58bd_m.jpg)
![[Linked Image from live.staticflickr.com]](https://live.staticflickr.com/65535/51444698000_62fb5b33eb_m.jpg)
![[Linked Image from live.staticflickr.com]](https://live.staticflickr.com/65535/51443983078_df5a4efd66_m.jpg)
![[Linked Image from live.staticflickr.com]](https://live.staticflickr.com/65535/51444698310_7689c7b6dc_m.jpg)