HA that sucker was dead in the traps.... little bastard was eating my tomatoes in the greenhous and I get the joy of watching him die over and over. can't get that from glue strips....
Last edited by JIM; 11/05/202009:41 PM.
I know a lot about a lot of things BUT I still have a lot to learn. Life is what you make of it. So, why not make a working machine to make it easier.
LOL!!! WOW!!-- great video Jim ---Tis the time of the year that they are looking for places to move in for the winter. ---cats here are stackin them up in the yard! --we always have a run after fields next door are harvested! Mice, voles, and possums are the worst! In the last week or so I got a dozen or more possums here by the porch in live traps. ---all have been about the same size, so probably all from the same litter. ---did get 2 big ones down in the machine shed last week.
"A machine you build yourself is a vote for a different way of life. There are things you have to earn with your hands."
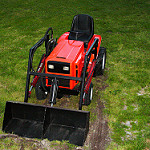
Moved a mulch pile a little further away from the driveway, so I will have more room to put snow later.
Before:
I got about 1/4 of it moved with the tractor before I got tired of messing with it and just grabbed a shovel.
After:
Carnage:
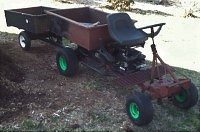
It keeps throwing the belt to the hydraulic pump. Pretty sure my pulleys aren't all in the same plane, especially the tensioner. I am thinking the whole thing deserves a rethink so that tension side of the belt goes direct to the pump pulley and then doesn't have to take a turn on the way back to get around the front wheel. That will probably involve relocating the pump, not sure yet where it will end up. Maybe under the console if I move the starter solenoid off to the side. Either that or hanging out front.
Runs motor pulley->tensioner (idler)->pump->flat idler (shiny thing in photo)->motor.
General belt drive rules say it is a bad idea to have an idler between your driving (motor) and driven (pump) pulleys. One strike.
Because the tensioning idler moves, that adds even more instability to the "tight" side of the belt (the flat one on the "slack" side is less of an issue). Strike two.
Also because it moves, there is play in the idler, between the swivel plate and frame, between the swivel plate and tension bolt, and between the idler mounting bolt and swivel plate, and within the idler bearings themselves. Strike three.
One of the gotchas of trying to basically move the pump to where the idler is now is that the drive belt also goes through that space. Pump out in front of the axle would limit the angles of slopes I can scoop material from, I was already pushing material with front frame brace trying to push the pile.
So...shim the pump/jackshaft and get it more parallel with the motor? (the footplate it is bolted onto might not be perfectly even with the engine mounting surface of the frame). Or find a better place to mount the pump?
One advantage of the current setup is I can swap out the engine without disturbing the pump. My ideal would be to find a way to drive the pump off the flywheel and ditch the belt completely. But modifying an older marginal engine to do that doesn't always seem like the best idea, it means you get locked into one engine or have to adapt every one that comes along.
I can relate to that I'm sure you saw my engine upgrade on my rig earlier this year. I understand your issues with the pump out front .. that's where mine is. Horizontal shaft so not much other choice. I really should make a skid plate to protect it . At least it's the back of the pump facing fwd. Could you fix a inside idler in place of the tensioner and add a tensioner or adapt the idler to be a tensioner so it's on the lee side of the pump instead of the power side? it would stabilize the belt better.. much less work to keep the belt from flapping on the slack side. not fighting the torque.
I know a lot about a lot of things BUT I still have a lot to learn. Life is what you make of it. So, why not make a working machine to make it easier.
in your mounts things are going to need some perfect alinement. --- it can be done! I have seen some really fancy around the corner runs. --- Space is always a problem on everything for sure. On your pulleys, have you tried to angle them to guide the belt? I have seen some weird set-ups on mowers that does work. Also on our old combines they ran belts to the straw spreaders around the corner and turned the belt from horizontal shaft to vertical shaft by the use of 2 pulleys ---- usually 1 flat and one v pulley set on an angle. ---- this is on long belts but might work on short ones too. Just thinkin out loud here!
"A machine you build yourself is a vote for a different way of life. There are things you have to earn with your hands."
The roof of my van needed some love... I pressure washed it and all the paint came off.. it was in rough shape. just after pressure washing. Just after wet blasting. yard before I fired up the pressure washer. Got some special primer for rusty metal. far as I got today this stuff has to cure 9 HRS. I'll get the white on in in a couple weeks.
I know a lot about a lot of things BUT I still have a lot to learn. Life is what you make of it. So, why not make a working machine to make it easier.
I've been working with mil-surplus primers, 2 gallon kits of two-part polyamide epoxy primer for $50/ea..the guy was from TX and had pics in his ebay listing of pallets of it for sale..I bought two (2)gallon kits and didnt use it for a few months,no big deal but man the stuff really is nice..green and yellow colors but it is primer..cures rock hard,I go back over it with 400grit then top coat..really makes for a nice foundation under a paint coating..I just did the steel roof on the golf cart I have,what a rusty mess,but after grinding it clean I laid two coats of the epoxy on it, man does it have some high build,but wear a respirator,this is the good stuff....I then top coated with Dupont 2-part Centari acrylic enamel..turned out nice. I love to paint. GM had a lot of problems years ago with primer and paint compatibility..Man that van roof has a lot of surface area Jim..and probably gonna be hard to reach out over it to paint as well..maybe tape the paint gun to a long pipe or tube?
Ive used it in the past that was solvent based man that stuff really stuck to ANYTHING and was a beotch to clean up afterwards..this is the newer water base vehicle, easy water washup,it really kinda is hard to adjust to after years of solvent based paint..progress i guess you can call it...good to see you got the roof in paint before the rain set in
workin on the snowblowers. Had to clean the flywheel and ignition module on this 10 horse tec. on the big blower,---now the carb has problems --- original carb---NO adjustments, so I ordered a chimna knockoff that IS adjustable.---waiting for it to come. Little 5 hp had to have new ignition module due to mice invasion a couple years ago. about got it back together ---- this blower is 25 years old and has never had gas or oil put in it. ---- Ran into it in a shed under a bunch of boxes ---- still on original pallet---or what the mice left of it.
"A machine you build yourself is a vote for a different way of life. There are things you have to earn with your hands."
I used one of the China -'chimna' as Sonny says it- carbs for a K181 Kohler 8hp engine..the carb shipped quick from New Jersey and fit right,even came with mount gaskets..I noticed it leaks a lot possibly from an internal passage,it was leaking making a spot on the ground..the bowl gasket leaked as well, I had to tighten it up a good bit but seems to be OK now..small assembly problems I guess..
I've had good luck with those cheap carbs. the metal is crap and corrodes really fast with ethanol though. Last longer if you can get non eth gas.
Made a trip to the house in Florida... Had a new roof put on it, still here.. get to see my mother. Her birthday is next Friday will stay here for that..
I know a lot about a lot of things BUT I still have a lot to learn. Life is what you make of it. So, why not make a working machine to make it easier.
The roof looks great.... They had to replace 8 sheets of ply, used 8 2x4s to doctor up some bad spots and 60' of facia. Glad I hired a company to knock it out. carport & front porch are covered with melt down. these guys did it right and kept every thing picked up as they went along.
I know a lot about a lot of things BUT I still have a lot to learn. Life is what you make of it. So, why not make a working machine to make it easier.
3.5 TON GAS PACK, A buddy of mine brought it by for me to evacuate it so he could scrap it. I asked him what was wrong with it. his customer wanted a new on one because this one was getting old and he didn't want start fixing it all the time. It's a 410 unit so It's newer than the split system I have hooked up now. Told him I would just keep it if he didn't care about the scrap.. He was happy that I took it off his hands. Control board was not working and the hot surface igniter was broken. I patched up the control board. every thing worked just fine So I ordered an igniter. Been running it on the ground for a couple weeks just to make sure it worked.. No failures Sooo I'm hooking it up permanently. Happy to replace a HEATPUMP with a GAS PACK Saw this when I pulled the board so I knew there was damage on the back of it.
YEP printed circuit took a hit in a couple of places.
Patch job. new board is $100 bucks
I know a lot about a lot of things BUT I still have a lot to learn. Life is what you make of it. So, why not make a working machine to make it easier.
built-in time delay failure point, easier to produce the PC board, justifies a service call later to sell you replacement parts.Years ago there would have been a set of leads out to a contactor or outboard relay. Glad to see you beefed it up-at least you'll know where to look if there is a failure. Is that a horiz discharge unit or downducted thru the roof? Gas pack heat too-nice!! I'd take those red leads all the way to the next terminal,not the copper trace,but thats just me.At least you got it up and running.
I have two 5T ex-military package units ready to go for my next shop,they were brand new surplus,I drove to Ohio to pick them up,man they are built nice,no plastic,no corners cut when they designed them, all 3ph with belt drive blowers that really pump it out..I was planning on putting them on a back room roof very similar to what you have done here in your photo..maybe make a mezzanine for them to sit on and make filter service easier
Once I get the duct work in place it'll sit a lot closer to the back wall and I'll have plenty of room on the deck to stand while servicing. This unit is convertible. is set up for side discharge which is good because that's the way I need it. the red wires are connecting solder points on the board where the terminal penetrates from the other side. I have that Monster diesel unit I got from a military surplus auction about 5 years ago. 120,000 BTU cooks me out of the shop even when I'm pulling the air directly in from outside. I have to leave the door open when I run it. No way to throttle it down either. It's designed for heating those building sized huge tents. My son expressed a desire to have it for his shop when I get the gas pack all hooked up. I intend to put a TEE on the return side so I can pull air straight in from out side when I need to create a positive pressure in the shop for painting or just venting smoke when I use the welder & plasma cutter.
I know a lot about a lot of things BUT I still have a lot to learn. Life is what you make of it. So, why not make a working machine to make it easier.
Got the gas pack all hooked up.. I have more to do with the ducting but it's hooked up and inside the building. Supply is good to go But I haven't even started the return yet. Got a temp filter set up on the inlet. Want to still come up with a way to shift the suction to an exterior inlet.. I'll have to sleep on it. Putting a Tee in between the building and the unit would have set the unit further out from the back wall. I have an idea that'll use the duct from the Diesel heater.
Big difference in duct size between the old H/P And the Gas pack. [url=https://flic.kr/p/2kgFvtn]
I know a lot about a lot of things BUT I still have a lot to learn. Life is what you make of it. So, why not make a working machine to make it easier.
so you are gong to make the unit inlet(return)tee mounted on the INSIDE of the barn with a extension duct to the outside for exterior air if I'm getting this right? sure sounds like it would work..
so you are gong to make the unit inlet(return)tee mounted on the INSIDE of the barn with a extension duct to the outside for exterior air if I'm getting this right? sure sounds like it would work..
Yes I'm going to use the duct where the diesel heater fed the shop from outside
I know a lot about a lot of things BUT I still have a lot to learn. Life is what you make of it. So, why not make a working machine to make it easier.


![[Linked Image from combo.staticflickr.com]](https://combo.staticflickr.com/pw/images/en-us/video_encoding_z.jpg)
![[Linked Image from live.staticflickr.com]](https://live.staticflickr.com/65535/50577229932_9b723b3dbd_m.jpg)
![[Linked Image from live.staticflickr.com]](https://live.staticflickr.com/65535/50577090491_5a43429ebd_m.jpg)
![[Linked Image from live.staticflickr.com]](https://live.staticflickr.com/65535/50577229297_891d6a0301_m.jpg)
![[Linked Image from live.staticflickr.com]](https://live.staticflickr.com/65535/50580713183_ae91c4ec9d.jpg)
![[Linked Image from live.staticflickr.com]](https://live.staticflickr.com/65535/50579698891_62aeeced63.jpg)
![[Linked Image from live.staticflickr.com]](https://live.staticflickr.com/65535/50580713148_709a3e7507.jpg)
![[Linked Image from live.staticflickr.com]](https://live.staticflickr.com/65535/50579834812_2b525e6dce.jpg)
![[Linked Image from live.staticflickr.com]](https://live.staticflickr.com/65535/50581569872_0f91ff6821.jpg)
![[Linked Image from live.staticflickr.com]](https://live.staticflickr.com/65535/50582488253_fd1b81c4a0.jpg)
![[Linked Image from live.staticflickr.com]](https://live.staticflickr.com/65535/50629838631_4c1118eb4d.jpg)
![[Linked Image from live.staticflickr.com]](https://live.staticflickr.com/65535/50629094678_06edbb6e5d.jpg)
![[Linked Image from live.staticflickr.com]](https://live.staticflickr.com/65535/50707765872_282912d856.jpg)
![[Linked Image from live.staticflickr.com]](https://live.staticflickr.com/65535/50706947173_6b6e4acf60.jpg)
![[Linked Image from live.staticflickr.com]](https://live.staticflickr.com/65535/50598123128_e15ed1fa25_z.jpg)
![[Linked Image from live.staticflickr.com]](https://live.staticflickr.com/65535/50598872631_65046ffd84_z.jpg)
![[Linked Image from live.staticflickr.com]](https://live.staticflickr.com/65535/50598123818_fd9fceb5de_z.jpg)
![[Linked Image from live.staticflickr.com]](https://live.staticflickr.com/65535/50598873031_ff7029be5e_b.jpg)
![[Linked Image from live.staticflickr.com]](https://live.staticflickr.com/65535/50716106373_4a32083431.jpg)
![[Linked Image from live.staticflickr.com]](https://live.staticflickr.com/65535/50716106163_bde5294a3a.jpg)
![[Linked Image from live.staticflickr.com]](https://live.staticflickr.com/65535/50716927087_ddd26f29d9.jpg)
![[Linked Image from live.staticflickr.com]](https://live.staticflickr.com/65535/50716106508_de2a6ecf2c_b.jpg)
![[Linked Image from live.staticflickr.com]](https://live.staticflickr.com/65535/50716307123_cd0ebb18c8_b.jpg)
![[Linked Image from live.staticflickr.com]](https://live.staticflickr.com/65535/50720512798_3af2d2aff8_b.jpg)